

How to Test A Voltage Regulator On A Lawn mower? (Easy Checklist)
Lawn mowing is a difficult task and requires skill to be done correctly. Lawnmowers are essential for proper and easy lawn mowing. However, maintain a lawn mower is not easy. So let’s find out how to test a voltage regulator on a Lawn mower.
Lawn mowing is a skill, and many people love to maintain their lawns. Lawn mowers have become essential for lawn mowing. The machine allows the user to have even mown grass with ease.
The functioning of them is pretty easy. However, maintain them is not an easy task to execute. A Lawnmower has a lot of parts, and it is important to keep track of the maintenance schedule of every single part.
You can compare the maintenance of a lawn mower to any vehicle such as; bike or car as they require similar maintenance.
Function of a Voltage Regulator on a Lawn mower:
The main function of a voltage regulator, as the name suggests, is to measure and regulate the voltage to the battery. In a lawn mower, the voltage regulator work is similar to the work of an alternator present in a car.
The voltage regulator assures that the battery is provided with the right amount of current to charge, which allows it to be in good shape for further use.
What happens if the Voltage Regulator is not maintained?
If the voltage regulator on your lawn mower is not maintained and ends up being damaged, it won’t function properly. This will cause the battery to drain out, and the battery won’t be able to charge.
A dead battery due to the voltage regulator will result to be harmful to the lawn mower. It won’t start and will lose power when running.
The only way to eliminate any of these scenarios is to test your voltage regulator often. This will allow you to be prepared for the necessary maintenance when required.
So let’s find out how you can test the voltage regulator of a lawn mower.
Testing the voltage regulator on a lawnmower:
The main issue that arises pointing out a problem in the voltage regulator is when the battery starts to drain out completely. If you have tested the battery and it is in good shape. The problem lies in the voltage regulator.
To test a voltage regulator, you can opt for a variety of procedures. However, the procedural steps may be different for each lawn mower as per their design and parts layout.
With that said, we are going to state to of the most common procedures to test the voltage regulator on a lawn mower. Regardless of the model of your lawn mower.
The first procedure to test voltage regulator is thru the battery.
Testing the voltage regulator thru the battery:
Step 1:- The tools that you will require to execute this procedure are a multimeter and some screwdriver and wrench to expose the battery of the lawn mower.
Step 2:- Unscrew any cover that is covering the battery and expose the battery of the lawn mower. Once the battery is exposed, you can start the test.
Step 3:- Take the multimeter and attach the positive cable of the multimeter to the positive terminal of the battery. Mostly the positive terminal is colored red or green. However, this may be different depending on the multimeter and battery. Therefore, make sure to properly analyze the positive sign before attaching the cable.
Step 4:- Now do the same with the negative cable and terminal. Again most commonly, the negative terminal is colored black but may be different depending on the model of equipment used.
Step 5:- Afterward, put a light load on the battery to start the test. To put the load on the battery, you can turn on the ignition or headlights, which will cause the battery to take a light load.
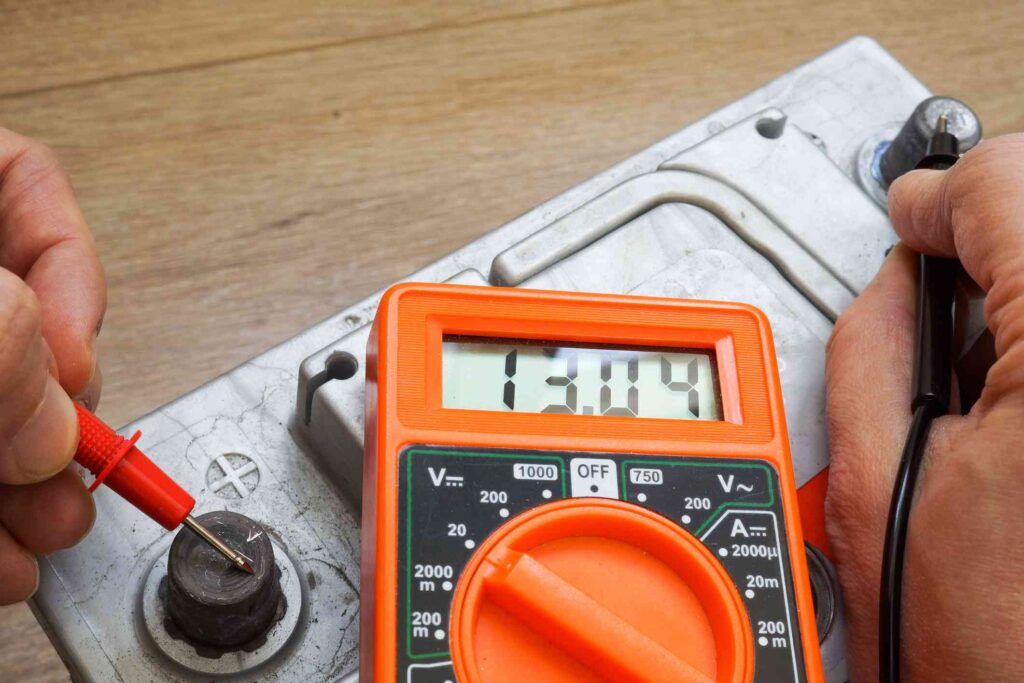
Step 6:- Now measure the reading of the volts that the multimeter provides you. The volt measured should be 12 volts. This 12-volt reading assures that the battery is in good shape and is not at fault.
Step 7:- Next up, start the lawn mower, give it a boost, and measure the reading again. Now the reading should exceed almost 13 or above. If the reading is around or above 13, this means that the voltage regulator is working fine.
Step 8:- However, if the reading is unchanged, it is a clear sign that the voltage regulator is not functioning, and you need to change it.
Testing the voltage regulator thru the voltage regulator itself
If you wish to test the voltage regulator directly and not thru the battery, this is the procedure that you can opt for. The tools required for this process are similar to the tools required for the testing thru the battery.
Step 1:- To start the test, simply unscrew any cover that covers the voltage regulator. Once the voltage regulator is exposed, connect the positive cable to the positive terminal and the negative cable to the negative terminal.
Most commonly, the positive cable is colored green or red, while the negative terminal and cable are colored black. However, it may differ depending on the model of multimeter and lawn mower.
Now execute similar steps as in previous method to measure the reading with a lighter load and then with a heavy load. Check if the reading changes. If it does, then it means the voltage regulator is fine. However, if it is unchanged, this indicates that it isn’t generating current and is faulty.
Final Thoughts:
We can conclude that voltage regulator plays a vital role in the working of the lawn mower. With the two steps that we discussed above, you can easily test the voltage regulator of your lawn mower.
The only equipment required for the job is a screwdriver, wrench, and multimeter. And with the precise implementation of the steps prescribed, you will be able to test the voltage regulator and have a hassle-free lawn mowing experience.